
Hoverboard repair sounds like something only a qualified electrician should do, and that is absolutely correct. However, if you are inclined towards mechanical and electrical repairs, and you have done some electrical repairing before, you can give this simple hoverboard repairing tutorial a shot.
Most hoverboards have batteries that are 36 volt 4.4 ampere hour lithium ion batteries. The wattage per hour can be calculated by multiplying 36 and 4.4, which comes to 158.4 wattage per hour. In general, lithium ion batteries up to 40 volts are unlikely to give you a harmful shock, but under certain conditions it can cause grave injury or even be fatal.
WARNING – ELECTRIC SHOCK WHILE ATTEMPTING HOVERBOARD REPAIR CAN CAUSE HARM AND EVEN BE FATAL
Just to keep our readers informed about possible risks, even a low voltage shock of just 20 volts can cause death if it passes through the heart. The reason being the brain sends electrical impulses to tell the heart when to beat, and any interference with that can be very dangerous, and can cause ventricular fibrillation. Moreover, respiratory paralysis can happen at an even lower voltage. Thus we advise great caution while attempting any repair. If in doubt, please call a professional electrician.
Many experienced electricians say that a little shock from a battery powered vehicle like the hoverboard or any other electric scooter can actually cause an aberration of your heartbeat.
We are not trying to scare you, but it is extremely important to take precautions when you take apart an electrically powered device like a hoverboard.
At Best Hoverboard Brands, we advise you to take every possible safety precaution before opening up your hoverboard.
QUICK TIP: If you open up the hoverboard and disconnect the battery, always press the power switch once to give out any residual charge that may be left in the hoverboard. Only then proceed with the repairing work.
Precautions before opening up your hoverboard
BEFORE DOING ANYTHING AT ALL POWER OFF THE HOVERBOARD AND REMOVE FROM CHARGING – Do not attempt to open the hoverboard while charging it, or when it is powered on.Wear proper electrician’s gloves which do not obstruct dexterity – check out Klein Tools Electrician’s GlovesRemove all rings and any kind of metallic jewelry – you can check out our popular guide on silicon wedding rings.Use a good home tool kit – you can try the Stanley 94-248 65-Piece Homeowner’s Tool KitKeep the hoverboard on a table or appropriate raised work areaMake sure that there is ample light falling on your work areaWear rubber sandals or leather shoesKeep children away from the place where you are working
BASIC REPAIR OF A HOVERBOARD
This repair guide covers the most basic repairs of your hoverboard which involve no complex electrical work, no soldering, no actual repair of components.
The most common problems that occur with a hoverboard are loose connections or disconnected wires inside the hoverboard. Another common problem is the calibration of the hoverboard going off. We will cover both of these things in this hoverboard repair guide which will work for your SwagTron hoverboard too.
THUMB RULE BEFORE OPENING YOUR HOVERBOARD – TRY RECALIBRATING IT
A general thumb rule for hoverboard repairs is that you should try and recalibrate it before attempting any real repairs or opening up the hoverboard.
To recalibrate the hoverboard, keep it on a plain level surface, exactly match both sides of the hoverboard and keep it level relative to the ground. Now, hold the power switch down for about 5 seconds, until the LED lights start to flash. Restart the hoverboard and the recalibration process is done.
WARNING: Do not press on any of the pedals while recalibrating, this is known to damage the gyroscope circuit boards of the hoverboards. Keep this in mind while recalibrating.
Here is a pretty straightforward video showing how a hoverboard is recalibrated:
If this solves the problem of your hoverboard, wonderful, you don’t need to read further.
HOW TO FIX LOOSE CONNECTIONS OR DISCONNECTED WIRES OF A HOVERBOARD
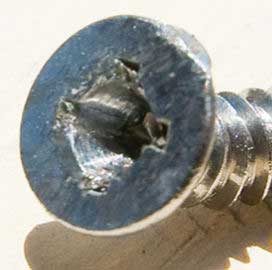
You have to unscrew the cover from the underside of the hoverboard. There are usually 18 to 20 screws. We recommend the use of a good quality cordless screw gun with a low power setting of around 3 or 4 to prevent. Using too much power will result in the screw head getting stripped. You can see a typical stripped screw on the right.
A good choice for a screw gun is the Bosch SGH182BL cordless screw gun which comes for around $214. If you don’t want to spend too much and want a handy tool for simple DIY household jobs then check out the Black & Decker BDCS40BI which comes for around $30.
When you open up the bottom covers of your hoverboard, you will see many wires and connections. As we point out the different parts of the hoverboard, and the various wires and cables, if you see any of them disconnected right away, then all you need to do is securely reconnect them. And this should solve your problem.
However, if you cannot see any obvious disconnected or loose wires right away, then you will have to disengage and then securely reconnect all the wires, and then check if the problem has been resolved.
Our suggestion is to first of all disable the battery. Open up the cover of the battery side first (the power button is on the motherboard side, and the opposite side is the battery side).
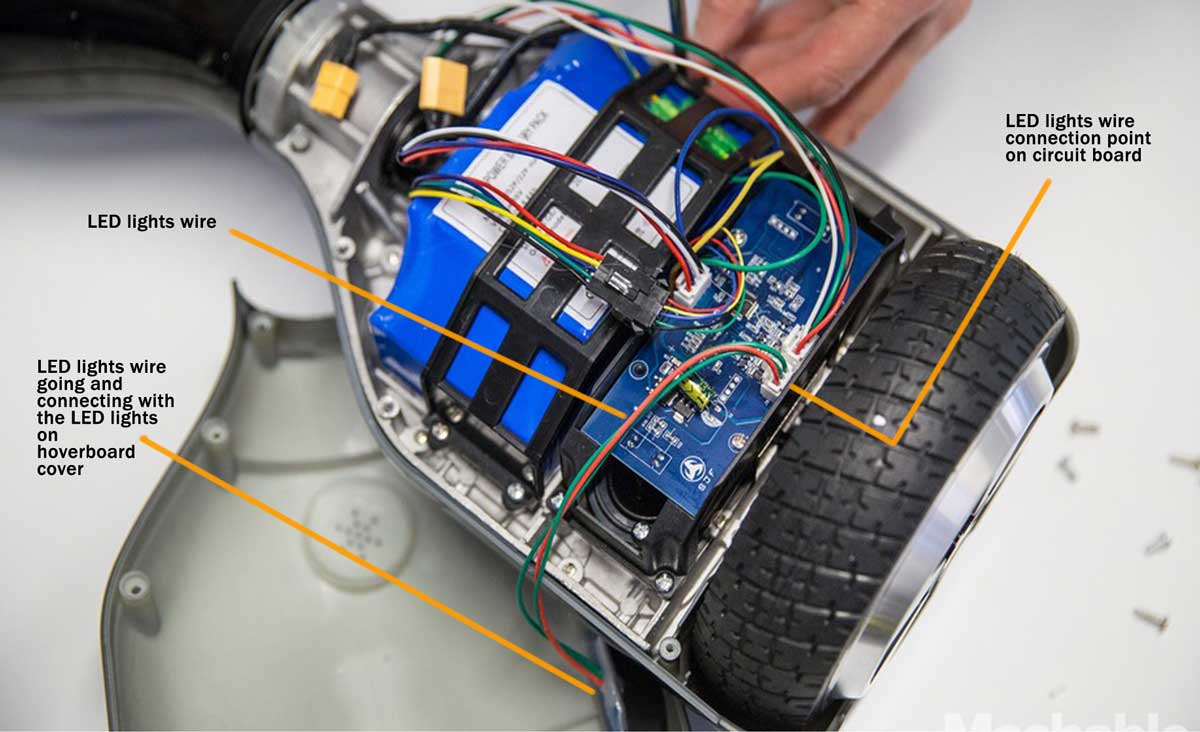
When the cover comes off you will notice that there is one wire connected to the circuit board next to the battery. This is the LED lights wire.
Just press the white buckle gently where the wire connects to the circuit board and unplug it. You can see the LED lights wire and the connection point on the circuit board next to the battery in the image below.
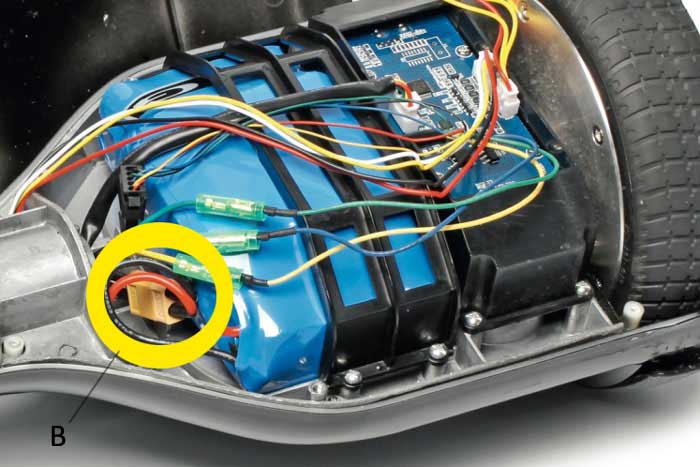
Once the cover has come loose, then the first thing you should do is pull out the cable that connects the battery to the hoverboard.
The battery cable is marked as B in the image below.
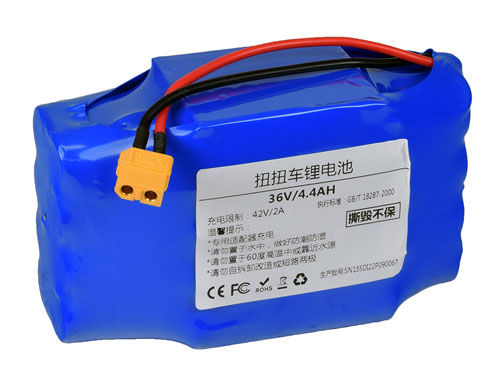
This is what a typical battery looks like:
You need to disengage the battery cable pulling it gently but firmly. Here is another image of the battery cable marked B.
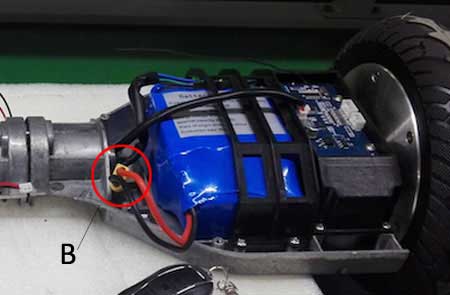
To get rid of any residual charge, after disconnecting the battery press the power switch once.
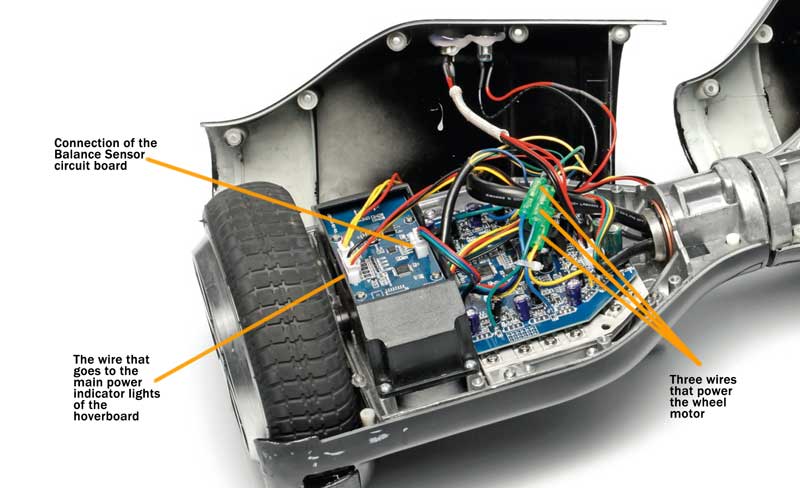
Next we need to look at the wires that power the motor of the wheel. They are three wires with green plastic sockets on them. They are marked BP1, BP2 and BP3 in the image below.
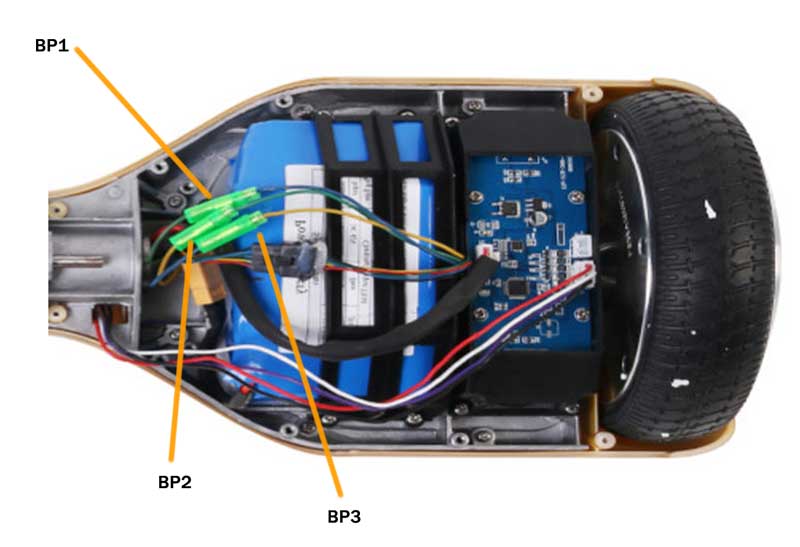
Now you need to disconnect the connector that connects the balance sensor board , which is shown in the diagram below. Then disconnect the wire that goes to the main battery indicator lights of the hoverboard. Finally disconnect the wire that goes to the motor of the wheel and controls it, which is the motor control wire. All the wires are marked in the diagram below.
Once you’ve disengaged all the wires on the battery side, take off the cover on the side that has the main circuit board.
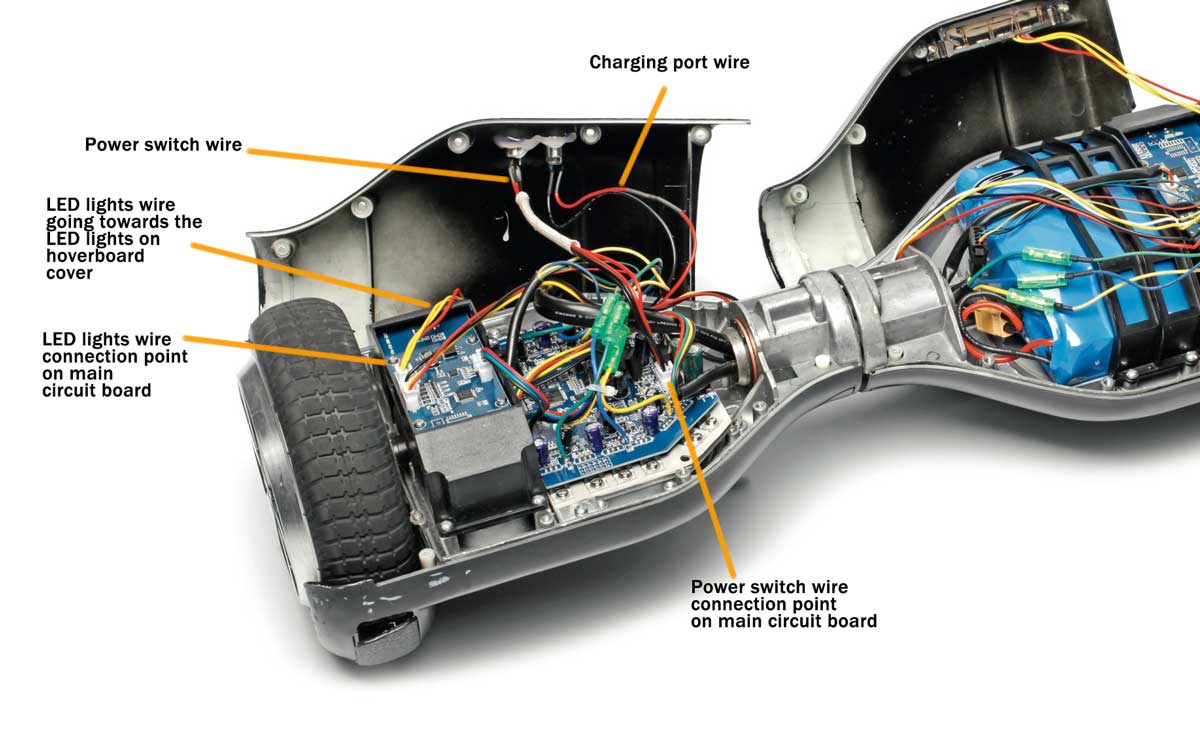
You will notice that there are a few wires that are connecting the cover to the main circuit board. These are the LED lights wire, the power switch wire and the charging port wire.
You will have to disconnect these wires from the main circuit board. You will need to press on the plastic buckle and gently pull them out. In the diagram below the LED lights wire, power switch wire and charging port wire is marked. You can also see the connection point of the LED lights wire on the circuit board and the power switch wire connection point on the circuit board.
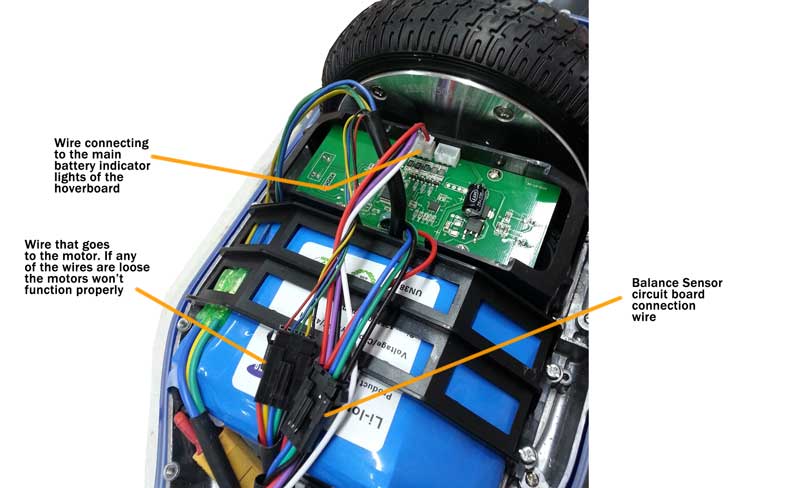
Next we need to look at the wires that power the motor of the wheel. They are three wires with green plastic sockets in between them. They are marked in the image below. Disconnect these wires. Then disconnect the wire connecting to the balance sensor board a shown in the image below. You will also need to disconnect the wire next to the LED lights connection, which goes to the main power indicator lights of the hoverboard, as shown in the image below. You will also have to disengage the motor control wires which is a similar wire and connector as on the battery side.
At this point you have all the connecting wires of the hoverboard disengaged. Now, carefully and securely plug them all back in as they had been before. Be very careful to connect them securely.
That’s it.
If the problems in your hoverboard had been because of loose connections or disconnected wires, then this simple reconnecting process should resolve it.
If this doesn’t work, then we suggest that you take it to an authorized hoverboard or electric scooter repair center near your home.
ADVANCED STUFF: WHAT THE BLINKING LIGHTS ON THE MOTHERBOARD OF A MALFUNCTIONING HOVERBOARD MEAN
If you are into advanced hoverboard repairing, then you may find this useful.
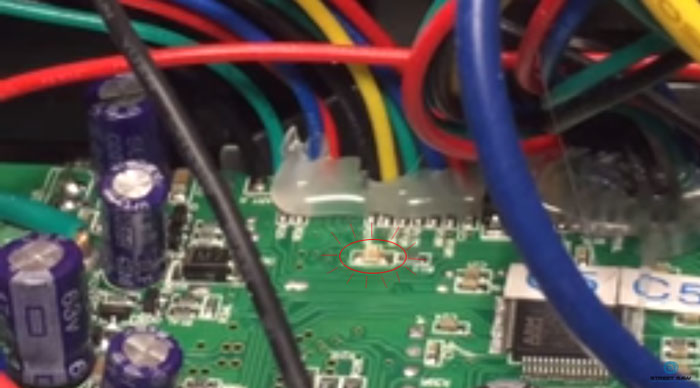
When you open up a hoverboard and then power it on, you will notice a blinking light on the main motherboard. Check the photo below to see the location of the blinking light:
Here’s a short video clip showing where the blinking light is:
Did you know that the pattern in which the motherboard’s light blinks actually indicates what the problem with the hoverboard is. This is the case with most standard hoverboards.
Here is a cheatsheet of what the blinking lights on the motherboard of a malfunctioning hoverboard imply:
HOVERBOARD BLINKING LIGHTS CHEATSHEET
No. of Times the Light on the Main Circuit Board Blinks (repeated pattern)
Problem It Indicates
0 Times
This indicates that the three individual wires going from the motherboard to the wheel are loose.
1 Time
This indicates that the connecting wire from the motherboard to the gyroscope circuit board is loose on the side which has the power switch.
2 Times
This indicates that the connecting wire from the motherboard to the gyroscope circuit board is loose on the side which has the battery.
3 Times
This indicates a problem with the motor. Usually a short circuit.
4 Times
This indicates that there is a fault with the wire connecting the motherboard to the motor of the wheel.
5 Times
This indicates that there is a fault with the wire connecting the motherboard to the motor of the wheel.
6 Times
This indicates that there is a problem with the battery. The battery will either have to be replaced or charged properly.
7 Times
This indicates a problem with the gyroscope circuit board on the side of the battery.
8 Times
This indicates a problem with the gyroscope circuit board on the side of the battery.
Looking for replacement parts for your hoverboard? This is the best place to buy them.
Parts and components of the hoverboard are available everywhere, from eBay to Ali Express, but to get reliable and trustworthy parts, we recommend going to the Amazon. If you buy a replacement part and on arrival you realize that the part was wrong, Amazon’s returns policy ill cover it. You can return the part within 30 days and get a refund or replace with another replacement part. Check out Hoverboard Replacement Parts on Amazon here.
Have a look at some of the best hoverboards avaiable today, here.
![]()
![]()
![]()
![]()