
You’ve got aggression in your soul, and those aggressive inline skates are your canvas for expressing it. You’ve landed your first grind, felt the rush of sliding, and perhaps even attempted a few aerials. But lately, a different itch has started to manifest. The desire to just cruise, to carve through plazas, to flow through the city streets with a responsiveness and agility that your current setup just isn’t providing. You’re eyeing those freeskates, the ones that hug corners and feel nimble underfoot, and a thought sparks: “Can I do this myself?” The answer, my friend, is a resounding yes. You can convert your aggressive inline skates into a freeskate setup. It’s not about buying a new pair; it’s about reimagining what your existing skates can be. This guide is your roadmap to that transformation, a step-by-step journey that will breathe new life into your trusty aggressive boots.
Before you grab your tools and start dismantling, it’s crucial to grasp what sets aggressive and freeskates apart. This isn’t just about aesthetics; it’s about fundamentally different design philosophies aimed at different styles of skating.
The Aggressive Stance: Built for Impact and Slides
Your current aggressive skates are engineered for resilience. Every aspect is geared towards withstanding the shock of landings and the friction of grinds.
Frames: The Unsung Heroes of Aggro
The most obvious distinction lies in the frames. Aggressive frames are characterized by their wider H-block, the recessed area between the two middle wheels. This H-block is designed to lock onto ledges and rails, providing a stable platform for grinding. The wheels are also typically smaller and flatter-topped, further aiding in lock-on and reducing the chance of catching an edge. The frame walls are often thicker and more robust to handle the immense forces involved in impacts. You’ll find that aggressive frames have a lower ride height, bringing your center of gravity closer to the ground for increased stability during grinds.
Soul Plates and Negative Grinds
The generous soul plates on aggressive skates are another defining feature. These are the large plastic areas on the sides of the boot that facilitate grinding on a variety of surfaces. They are specifically shaped to allow for soul grinds, royales, and other specialized tricks. The negative space within these plates is also designed to accommodate the frame and wheels during grinds.
Wheel Setup: The Grind-Focused Configuration
Aggressive skates almost exclusively use a “rockered” or “anti-rocker” setup. This means the middle wheels are often smaller or entirely absent to create a groove for the H-block. This setup prioritizes stability and lock-on for grinds, sacrificing some maneuverability and flatground speed. The wheels themselves are generally harder, designed for durability rather than grip.

- ENTRY LEVEL INLINE SKATES Created for adults and youth. Sturdy frame with lower center of gravity enhances stability and make it easy to keep balance. A wonderful choice for novice to learn skating.
- RECREATIONAL SKATES Fully wrapped with Honeycomb mesh. Breathable and lightweight upper cover the foot while dissipating heat. Enjoy roller skating at the rink and outdoors all seasons.
- COMFORTABLE & ADJUSTABLE Inline skates offer the range to accommodate either thick or thin socks to suit the changing seasons.You can adjust them to the perfect length for comfortable skating with the push of a button on the each skates. How to check a button: Press it and you should feel strong spring tension.
- HIGH PERFORMANCE STRUCTURE The arch-shaped structure of the ankle effectively transfers energy, combined with smooth bearings to help the wheels rolling more freely and increase the stride.
- SAFE AND CONVENIENT CLOSURE Locking cuff buckle, straps and laces triple fixation for easy wearing, and closure system secure the foot in the skates to enhance fit and improve skating performance.

- ADJUSTABLE INLINE SKATES - (Please must confirm the size before placing the order).Our inline skates have 4 different Unisex size , S/M/L/XL, and each size is adjustable , Please make sure to choose the correct size via checking enclosed size chart pictures . And do not forget to adjust the length of boot by the push button before wearing, you will find that it's so convenient to operate, and kids and youth can use it for many years even though their feet are growing up.
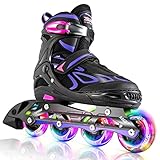
- 8 WHEELS ILLUMINATING - Our inline skates for kids come with four illuminating wheels that lights up automatically when you start to skate. The lights are powered by wheels rolling and never need replacement batteries! Just imagine how cool it will be to flash as bright as a lighting bolt in the dark !
- STURDY AND SMOOTH - Frame of our inline skate is made from reinforced aluminium alloy , high rebounded 82A polyurethane wheels are wear resistant & more smooth, high-speed mute ABEC-7 bearings are made from premium quality carbon steel. Just enjoy a smooth, quiet and confident ride.
- SPECIALLY DESIGNED SKATES SOCKS & SINGLE BRAKE DESIGN - Unique fashion design skate socks will make your roller skating moment amazing. Reinforced heel and toe for resistance and outstanding durability. The single brake is equipped on right foot instead of two brakes installing on left and right feet to prevent the danger of falling backwards when braking.
- DEVOTED CUSTOMER SERVICE - We have 100% confidence in our inline roller skates. Contact us if you have any question about our inline skates, we will happily accommodate and work with you. All issues will be solved within 24 hours.

- 4 Sizes Adjustable Inline Skates: Kids can ride on these skates for a long time for you’ll be able to increase the boot up to four sizes. 4 sizes available: Small for little kid; Medium for big kid; Large for young adult, X-Large for adult, check the image of our size chart for specific length of the boot
- 8 Wheels Illuminating Inline Skates: Gain confidence in our stylish design in mint. With the coolest light up wheels, make your little girl a real shining star. Wheels are designed as self-generated power system, no battery needed
- High-end Features Roller: Enjoy a smooth, quiet and confident ride on the reinforced aluminium frame, 82A polyurethane wheels and high quality ABEC-7 bearings. Premium performance and special light up bonus, totally worth the price
- Triple Closure for Kids: Includes cam lever buckles, 45 degree strap and laces. An easy system to get in and out of the skate quickly and nicely, even your kids can do it by themself
- Sincere Service: Order with confidence due to our dedicated customer and product experience. Every question or problem will be answered and solved nicely and promptly

- FOUR SIZES ADJUSTABLE: MammyGol inline skates have 4 different Unisex size , S(10-13US)/M(1-4US)/L(5-8US), and each size is adjustable, only need 1 push button to adjust different sizes. Please make sure to choose the correct size via checking size chart pictures. Let our inline blades skates grow with your child
- COOL LIGHTNING WHEELS: With the coolest light up wheels, make your little boy a real shining star. Wheels are designed as self-generated power system, no battery needed! Just imagine how cool it will be to flash as bright as a lighting bolt in the dark
- PREMIUM PERFORMANCE: 82A PU wheels and tough ABEC-7 bearings ensure miles of smooth rolling with durability and fast. Soft liner provides good sweat absorbent ability, extra padding in the front prevent kid's toes from hurting
- BENEFITS OF INLINE SKATING: Improves coordination, agility & dynamic balance, promote the development of the cerebellum, increases Self-Confidence, thus make your child stand out from their peers
- PERFECT BIRTHDAY/CHRISTMAS GIFT: The MammyGol Skates comes in a color gift box and was designed to be the perfect gift for your child, grandchild or nieces and nephews. Delivered in an impressive finished box that will surely make your little one screaming in excitement and joyfulness! Suitable for over 4 years old children
- 4 Sizes Adjustable Inline Skates: Kids can ride on these skates for a long time for you’ll be able to increase the boot up to four sizes. 4 sizes available: Small for little kid; Medium for big kid; Large for young adult, X-Large for adult, check the image of our size chart for specific length of the boot
- 8 Wheels Illuminating Inline Skates: Gain confidence in our stylish design in Violet & Magenta. With the coolest light up wheels, make your little girl a real shining star. Wheels are designed as self-generated power system, no battery needed
- High-end Features Roller: Enjoy a smooth, quiet and confident ride on the reinforced aluminium frame, 82A polyurethane wheels and high quality ABEC-7 bearings. Premium performance and special light up bonus, totally worth the price
- Triple Closure for Kids: Includes cam lever buckles, 45 degree strap and laces. An easy system to get in and out of the skate quickly and nicely, even your daughter can do it by herself
- Sincere Service: Order with confidence due to our dedicated customer and product experience. Every question or problem will be answered and solved nicely and promptly
- Traditional Lacing - Customize your lacing and knot the same way you tie your shoes
- Stability Plus Cuff - Provides the right amount of support, flexibility, reliability and comfort to have a good time
- F.B.I. frame - is a vibration-absorbing composite frame that is interlocked with the base, keeping the rider more balanced by being lower to the ground
- ABEC 5 Bearings - dependable spin perfect for beginners
- 80mm 80A Wheels

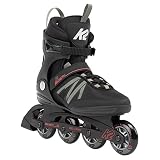
- Soft boot design with comfort memory foam padding and locking cam lever buckles
- Aluminum Tri-Coil
- 80mm Elite Speed wheels
- Bevo Gold 7 Race rated bearing
- In Men's U.S. shoe sizes

- THIS SKATE IS FOR - Recreational skaters looking for comfort and stability.
- HIGH CUFF FOR ADDED SUPPORT - Durable shell makes learning to skate easier
- COMFORT PERFORMANCE LINER - Padded liner and secure closure system ensure snug fit; Footboard sizer for fit adjustment
- MONOCOQUE FRAME - Durable frame for a lower center of gravity enhances stability
- ROLLERBLADE PERFORMANCE WHEELS - 80mm/82A wheels and SG5 bearings for better wear and moderate speed
The Freeskate Flow: Speed, Agility, and Versatility
Freeskates, on the other hand, are designed for fluid movement, carving, and navigating urban environments with ease. They prioritize a different set of characteristics.
Frames: Streamlined for Speed and Maneuverability
Freeskate frames are typically narrower and lighter than aggressive frames. They lack the prominent H-block, instead featuring a flatter profile that allows for faster rolling and more direct contact with the ground. The frame walls are often thinner, further reducing weight and enhancing responsiveness. The focus here is on enabling quick turns, smooth glides, and effortless acceleration.
Boot Design: Comfort and Support for Long Sessions
While aggressive boots are built for impact absorption and structural integrity, freeskate boots often prioritize comfort and ankle support for longer skating sessions. They might be slightly less rigid but offer more padding and a snugger fit for prolonged wear and precise control.
Wheel Setup: Maximizing Contact and Smoothness
Freeskates generally employ a “flat” or “rockered” setup with all wheels touching the ground. A flat setup (all wheels the same size) provides maximum contact area, leading to increased stability and speed. A slight rocker, where the middle wheels are slightly smaller, can enhance maneuverability and make initiating turns easier. Freeskate wheels are typically softer than aggressive wheels, offering better shock absorption and grip on varied surfaces.
If you’re looking to transition from aggressive inline skates to a freeskate setup, you might find it helpful to read about the various modifications and adjustments needed for optimal performance. A related article that provides insights into different skating setups can be found here: Top 10 Best Snowmobile Dolly – Latest Bestsellers Only. This resource can offer you valuable tips on equipment and techniques that can enhance your skating experience.
The Conversion Process: Step-by-Step
Now that you understand the fundamental differences, let’s dive into the practicalities of transforming your aggressive skates. This is where your hands-on skills come into play.
Step 1: Deconstruction – Letting Go of the Aggro
The first order of business is to carefully dismantle your current aggressive setup. You’ll need a few basic tools for this, and patience is key.
Gathering Your Tools
You’ll likely need:
- Allen wrenches (hex keys): These are essential for removing the frame bolts. Most aggressive skates use standard M6 bolts.
- Screwdriver: Some components might have screw fastenings.
- Pliers: Useful for holding nuts or small parts.
- Loctite (optional but recommended): For securing your new frame bolts to prevent them from loosening during skating.
Removing the Aggressive Frames
This is the most significant part of the deconstruction.
- Locate the frame bolts: These are usually visible on the bottom of your boot. There will typically be two bolts per frame.
- Apply leverage: Use your Allen wrench to loosen and remove the bolts. You might need to hold the nut on the other side with pliers if it spins freely. Be prepared for a firm grip as these are often tightened securely.
- Gently pry off the frame: Once the bolts are removed, the frame should lift off. Sometimes a bit of gentle wiggling or prying with a flathead screwdriver (be careful not to damage your boot) might be necessary.
- Inspect the mounting points: Note the position and type of mounting on your boot. This is crucial for selecting compatible freeskate frames. Most aggressive boots use UFS (Universal Frame System) or Kizer Universal System (KUS) mounts, which are common for freeskate frames as well.
Removing Wheels and Bearings
While you’re at it, it’s a good time to remove the wheels and bearings from your aggressive setup.
- Loosen wheel nuts: Use your skate tool or Allen wrench to loosen the nuts that hold the wheels in place.
- Slide off the wheels: Once loose, the wheels should slide off. You may need to push them off the axle.
- Extract bearings: Bearings are usually press-fit into the wheels. You can often use the axle itself to pry them out by placing the bearing on the edge of the axle and pushing down on the wheel. Be gentle to avoid damaging the bearing shields or races.
Step 2: Selecting Your Freeskate Frames
This is where you define the personality of your newly converted skates. Your choices here will significantly impact how they feel and perform.
Understanding Frame Mounting Systems
As mentioned, most modern aggressive boots use UFS. If yours do, you have a wide array of freeskate frames available. If you have older skates with a different mounting system, you might need to do more research or consider different frame styles.
Frame Length and Wheel Size Considerations
- Frame Length: Freeskate frames come in various lengths, often measured by the maximum wheel size they can accommodate. Shorter frames (e.g., 210mm, 230mm) offer more agility and quick turns, ideal for urban maneuvering. Longer frames (e.g., 243mm, 255mm) provide more stability at higher speeds and a smoother ride. For a freeskate conversion, you’ll generally want a frame that allows for at least 76mm or 80mm wheels, and often up to 90mm or 100mm for a more dedicated freeskate feel.
- Rocker Options: Many freeskate frames offer different rocker configurations.
- Flat rocker: All wheels are the same size, providing maximum contact and stability. This is a great starting point for a versatile freeskate.
- Slight rocker (e.g., 2mm, 4mm): The middle wheels are slightly smaller, making turns more intuitive and carving easier. This often replicates the feel of a well-rockered ice skate.
- Maximum rocker: The middle wheels are significantly smaller, creating a more pronounced curve for extreme maneuverability. This can be a bit twitchy for beginners but offers incredible agility.
Popular Freeskate Frame Brands and Styles
You’ll find frames from brands like Kizer, Powerslide, USD, and Roces. Look for frames specifically marketed as “freeskate frames” or “urban frames.” They will typically be narrower, lighter, and designed to accommodate larger wheels. Consider frames like the Kizer Advance, Kizer Level, or Powerslide XXX frames, depending on your intended use.
If you’re looking to transition from aggressive inline skates to a freeskate setup, you might find it helpful to explore a related article that discusses various tips and techniques for making this conversion smoothly. Understanding the differences in wheel size, frame design, and overall skating style can significantly enhance your experience. For a deeper dive into this topic, check out this informative piece on skate setups that can guide you through the process and help you make the most of your new skating adventure.
Step 3: Building Your Freeskate Wheel Setup
The wheels are what connect you to the pavement, and their selection dramatically impacts ride quality.
Choosing the Right Wheel Diameter
For a freeskate setup, you’ll want wheels that are larger than typical aggressive wheels.
- 76mm – 80mm: This is a common and very versatile range for urban skating. It offers a good balance of speed, maneuverability, and shock absorption.
- 84mm – 100mm: These larger wheels provide significantly more speed and a smoother ride over rough terrain. They are excellent for long-distance cruising and open-space skating. However, they can make your skates feel less agile in tight spaces.
Understanding Wheel Durometer (Hardness)
Wheel hardness is measured on the Shore A durometer scale.
- 78A – 82A: Softer wheels offer more grip, shock absorption, and a quieter ride. They are excellent for rough surfaces and general cruising, but they wear down faster.
- 83A – 86A: These are harder wheels that offer more speed, a more direct feel, and better durability. They are suitable for smoother surfaces and more aggressive freeskating where speed and longevity are key. For a general freeskate conversion, aiming for wheels in the 82A to 84A range is a good compromise.
Bearing Considerations
You’ll need new bearings for your freeskate wheels. If your aggressive skate bearings are still in good condition, you could reuse them, but new bearings will significantly enhance the performance and speed of your freeskate setup. Ensure you get bearings compatible with your wheel core. ABEC ratings (ABEC 3, 5, 7, 9) indicate manufacturing tolerance, with higher numbers generally implying smoother, faster bearings. For freeskating, ABEC 5 or 7 are generally considered a good balance of performance and durability.
Step 4: Assembly – Putting it All Together
With all your components in hand, it’s time to bring your freeskate vision to life.
Mounting the New Frames
This is the reverse of the deconstruction process.
- Align the frame: Place the new freeskate frame onto the mounting points of your boot. Ensure it sits flush and is correctly oriented.
- Insert frame bolts: Carefully guide the frame bolts through the boot and the frame.
- Tighten bolts: Begin by hand-tightening the bolts to ensure they are threaded correctly and not cross-threading.
- Secure with Allen wrench: Once hand-tight, use your Allen wrench to tighten the bolts. Tighten them evenly and progressively. You don’t need to overtighten, but they should be snug and secure.
- Apply Loctite (optional): For added security, apply a small amount of blue Loctite to the threads of the frame bolts before tightening. This will prevent them from vibrating loose during skating.
Installing Wheels and Bearings
- Insert bearings into wheels: Place one bearing into each side of the wheel. You can often push them in with your thumbs, or use a bearing press for a cleaner fit.
- Place spacer (if applicable): Some wheel and bearing setups require a small spacer that sits between the two bearings inside the wheel. If your setup includes one, ensure it’s in place.
- Mount wheels onto the frame: Slide the wheels onto the frame axles. Make sure the bearings are seated correctly.
- Tighten wheel nuts: Use your skate tool or Allen wrench to tighten the wheel nuts. Tighten them until the wheel spins freely without excessive wobble, but not so tight that it binds.
Step 5: Dialing in Your Setup – The Final Touches
Even after assembly, a few adjustments can make a significant difference.
Balancing and Adjusting Your Rocker (If Applicable)
If you’ve chosen a frame with a selectable rocker, take some time to experiment. Start with your preferred setting and then try adjusting it to see how it affects your turning and stability. Remember, you can often adjust the rocker by simply swapping wheel sizes or using different size wheels in specific positions.
Checking for Wobble and Binding
Spin each wheel. It should rotate smoothly and freely for a good amount of time. If a wheel feels sluggish, it might be overtightened or one of the bearings might be damaged. If there’s excessive side-to-side play, the nut might be too loose.
First Ride Impressions and Adjustments
Your first ride is crucial for fine-tuning. Pay attention to:
- Turning response: Do the skates turn as you expect? Are they too stiff or too twitchy?
- Stability: Do you feel balanced and confident?
- Comfort: Are there any pressure points or discomfort?
You might need to make minor adjustments to your frame bolt tightness or wheel nut tightness based on your initial experience. Don’t be afraid to experiment and find what feels best for you.
The Benefits of Your New Freeskate Setup

You’ve put in the work, and the rewards are manifold. Your newly converted skates are no longer confined to the skatepark; they are now gateways to a new world of urban exploration.
Enhanced Agility and Maneuverability
The narrower frames and larger, flatter wheels allow for much quicker edge-to-edge transitions. You’ll find yourself able to carve through tight turns with newfound grace and precision. Navigating crowded pedestrian areas, weaving around obstacles, and responding instantly to the ever-changing urban landscape becomes a joy rather than a challenge.
Increased Speed and Efficiency
The larger wheel diameter means more surface area in contact with the ground and a greater distance covered with each revolution. This translates to a noticeable increase in speed and less effort required to maintain momentum. Gliding across longer distances becomes significantly more enjoyable, allowing you to explore further and faster.
Smoother Ride and Shock Absorption
The combination of larger wheels and often softer wheel durometer provides a much smoother ride. Small bumps, cracks, and imperfections in the pavement that would have been jarring on your aggressive skates are now absorbed, making your skating experience more comfortable and less fatiguing.
Versatility for Urban Skating
Your converted skates are now perfectly suited for a wide range of urban skating activities. From leisurely cruises through parks and city streets to more dynamic maneuvers like power slides, crossovers, and even some light slalom, your setup is ready for anything the urban environment throws at you. They are also excellent for transportation, providing a fun and efficient way to get around.
When to Reconsider or Upgrade

While conversion is a fantastic option, there are times when it might be more beneficial to consider dedicated freeskates or even a completely new pair.
Limitations of Aggressive Boot Materials
Aggressive boots are designed to withstand the abuse of grinding and impacts. This often means they are made from stiffer, more rigid materials. While this provides support, it can sometimes lead to a less forgiving or comfortable feel for extended freeskate sessions compared to boots specifically designed for comfort and breathability.
The Importance of Boot Fit
Ultimately, the best skates are the ones that fit your feet perfectly. If your aggressive boots, despite the frame conversion, still feel uncomfortable, too stiff, or don’t offer the right support for your foot shape, it might be time to invest in a pair of dedicated freeskates. The right fit is paramount for both performance and injury prevention.
Long-Term Investment Considerations
If you find yourself enjoying freeskating as much as you anticipated, or even more, you might eventually want to invest in a dedicated freeskate boot and frame setup. This would allow you to optimize both components for freeskating, potentially offering superior performance, comfort, and durability for your chosen style. However, the conversion process is an excellent way to test the waters and ensure this is the path you want to take before making a larger financial commitment.
You’ve unlocked a new dimension of skating by transforming your aggressive inline skates into a versatile freeskate setup. This journey has not only saved you money but has also empowered you with the knowledge and skills to customize your gear. So, strap on those boots, feel the difference, and let the city become your playground. The smooth glide, the responsive turns, and the sheer joy of unhindered movement await you. This is just the beginning of your freeskating adventure.