Aerial photography has come a long way since its inception. In the early days, photographers…
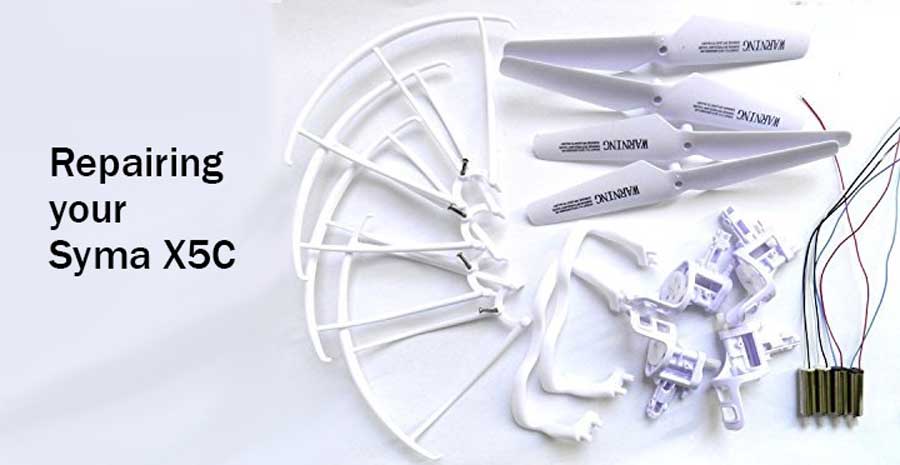
How to repair the Syma X5C drone and replace its motors

Let me start with a fair warning. I am a drone enthusiast, and I have been flying and tinkering with drones for years now. That is why I was able to take it apart and repair it. Unless you are experienced with drones and have some mechanical background, I suggest that you take it to a repair center rather than repair it yourself.
In essence, follow this repairing tutorial at your own risk and knowing that your efforts may not be a complete success.
If you are confident that you can repair your Syma X5c, or if you are willing to take the risk, then read on my friend.
How to replace the motor in the Syma X5C drone
Some months back, I was flying my Syma X5C in my backyard and taking some small risks and swooping here and there like Charpo the best drone racer, and it crashed.
The Syma X5C fell into slightly tall grass, and it took me a few minutes to recover it. In the mean time, the propellers of the drone had got badly entangled in the grass as the motor had kept running.
I did my best to remove the grass and bits of shredded leaves around the propellers and the motor shaft. After some efforts when it looked like I had removed all the debris, I tried to fly the drone, but the motors didn’t start.
I thought I will wait for a while and let the drone cool down some more, and start it. When IO tried again, the motor still didn’t start. It finally dawned on me, that my beloved Syma X5C had broken.
The outer body of the drone was not damaged in any way as it is made from very durable and lightweight material, but it was some component inside that had failed.
The only way to check what was wrong was to open up the drone and look at all the electrical components of the drone. In fact I had to check every component of the Syma X5C to see what could be the problem.
The first thing I did was look at the wiring and any soldering that may have come off, but found nothing wrong there.
I powered on the drone again while it was open and was happy to note that two of the motors had come on. However two of them were not coming on. I quickly changed the motor places, to test if anything was wrong with the connecting wires or circuit board. This time also, the same two motors were working and two defective ones weren’t.
I was relieved, as now I knew that nothing as such was wrong with the drone or the main circuit board, only the two motors were not working.
I carefully removed the two ‘dead’ motors from the drone, and immediately saw that one of the motors had overheated and the base of it had melted and got mangled.
Some important information about motors of drones - related to Syma X5C Motor Replacement
Drones usually have four motors, and two of these motors rotate clockwise and two of them rotate anti-clockwise. By the way that is the reason that we also have two propellers that are slightly different form the other two. Keep this fact in mind whenever you plan to change the motors of your drone.
Coming back to my repairing efforts, in the Syma X5C the clockwise and anti-clockwise motors can be identified by the wiring of the motors. The two motors which rotate clockwise in the Syma X5C has blue and red wires going into them and the other two motors have white and black wires going into them.
Looking for replacement components for the Syma X5C
I was determined to get my beloved drone flying again, so I started to look for replacement parts online. I was very happy to see that there were plenty of options for buying replacement motors, propellers and a whole host of parts of the Syma X5C drone.
It actually took me all of ten minutes to identify the spare parts, motors and other components that I needed and to place my order. A point to be noted is that these parts were all quite cheap.
I had placed an order for an anti-clockwise motor and one motor base of the Syma X5C. It was quite cheap and shipping was also free. Great.
Since I had ordered from a reputable website, namely Amazon, my orders came very quickly. I also had the option of using Aliexpress or Banggood, but I did not want to wait for so long.
I also ordered some repairing tools that I had been wanting for some time.
What tools and components I used for repairing the Syma X5C
Before I began my repair process, I put together everything I need for the project. This included:
- A set of small screwdrivers
- Pliers that could cut through wires and also plastic
- A voltmeter
- A soldering iron
- Soldering tine lead resin
- A small home tool set with 35 components ranging from LED torch to small hammer to tweezers
- The motor I purchased
- The motor base I purchased
The first step was to remove the battery of the drone so that there is no chance of any short circuit or problem due to electrical charge running through the drone components.
Then very carefully I removed all the faulty components of the drone, which included the two motors.
Important Note on Syma X5C Motor Wiring
Before removing the motors make a very careful note of which motor was where, and what were the colors of the wires coming from the motors to the circuit board and where they were connecting on the circuit board.
This sounds a little complex, but actually is pretty simple. Let me explain with the image below.
As you can see the circuit board is marked with motor connector points with the letter M. You will see M1+, M1-, M2+,M2-, M3+, M3-, M4+ and M4-. To all these points on the circuit board the wires of the four motors are connecting. If you make a note there are white and black wires from the one set of two motors and red and blue from the other set of two motors. As I have already mentioned, these are the clockwise and anti-clockwise motors.

Remember to make a very careful not of this, in fact take a photograph so that you can refer to it later.
Once you have noted down the connections etc. then very carefully, I began to replace the faulty parts with the new parts that I had ordered online. This required quite a bit of soldering and also removing original soldered wires from the circuit board.
The Syma X5C circuit board thankfully has very clearly marked points for connecting the wires of the motors, as I explained before. Every point of connection is marked with the letter M and number and the polarity of the point.
Here is a quick cheat sheet on how to connect the motors to the points on the circuit board.
Anti-clockwise motors have black and white wires coming out of it, the clockwise motors have red and blue wires coming out of it.
- To the points marked M1- and M1+, you need to connect an anti-clockwise motor. Connect the white wire to M1+ and the black wire to M1-.
- To the points marked M2- and M2+, you need to connect a clockwise motor. Connect the red wire to M2+ and the blue wire to M2-.
- To the points marked M3- and M3+, you need to connect an anti-clockwise motor. Connect the white wire to M3+ and the black wire to M3-.
- To the points marked M4- and M4+, you need to connect a clockwise motor. Connect the red wire to M4+ and the blue wire to M4-.
Once I had replaced the components and carefully reconnected the motors and soldered the wires in, I felt that I had done a decent job. Now the main test.
I did a temporary battery connection and powered on the drone, and all four motors came to life. Wonderful.
Next I put the cover of the drone back on, tightened the screws, put the propellers and it was ready for the first proper flight. I powered it on, and it flew straight up and responded perfectly to my controller stick movements. It was a great success!
How to recalibrate and reset the Syma X5C
When you fly the Syma X5C, every once in a while you will see that the drone has got a little lopsided in its flight or movements. That is because its calibration has gone off. This is very normal and can be fixed very easily.
In a quick nutshell, you need to switch on the remote controller and the drone, then you need to connect the controller to the drone by moving the right joy stick straight up and straight down, then you need to pull both the left and right sticks downwards and to the right simultaneously, and you are done.
If you have got it great, if you haven't then these images will help you understanding the simple process of recalibrating and resetting the Syma X5C drone.

Figure 1
Figure 1
Once you have switched on the Syma X5 C drone and the controller, look for the led lights on the drone. They will be blinking in a regular slow pace. You need to pull up the left joystick of the controller all the way up and then all the way down. You will notice that the blinking lights now go from slow blinking to a solid. This means the controller has connected with the drone.

Figure 2
Figure 2
Once the binding between the controller and the Syma X5C has happened, then you need to actually do the calibration. This is very simple and all you need to do is pull both the joysticks downwards and to the right, as shown in the figure above. You will notice that the led lights start to blinking very fast for a while and then go back to normal. This means the Syma X5C drone has been re-calibrated and is good to go.
Enjoy flying the re-calibrated drone!
Don't forget to have a look at one of our most popular resources - best drones for every budget!
Related Posts


This Post Has 0 Comments